はじめに
これまで、NginXのインストールからphp-fpmのインストールまでを行ってきました。
本記事では、mysqlの導入までを行います。
(あくまでローカルの開発環境をすぐに構築するということに焦点を当てています。
細かい設定はまるっきり省いています)
NginX構築に関しては下記を参照ください。
PHP環境構築については、こちらを参照ください。
FTPサーバの準備については、こちらを参照ください
mysqlのインストール
インストールするまえに、既存でインストールされているmariadbのライブラリを削除します。
$ yum remove mariadb-libs
$ rm -rf /var/lib/mysql
下記の様に削除が完了です。
読み込んだプラグイン:fastestmirror, langpacks
依存性の解決をしています
--> トランザクションの確認を実行しています。
---> パッケージ mariadb-libs.x86_64 1:5.5.65-1.el7 を 削除
--> 依存性の処理をしています: libmysqlclient.so.18()(64bit) のパッケージ: 2:postfix-2.10.1-6.el7.x86_64
--> 依存性の処理をしています: libmysqlclient.so.18(libmysqlclient_18)(64bit) のパッケージ: 2:postfix-2.10.1-6.el7.x86_64
--> 依存性の処理をしています: mariadb-libs(x86-64) = 1:5.5.65-1.el7 のパッケージ: 1:mariadb-5.5.65-1.el7.x86_64
--> トランザクションの確認を実行しています。
---> パッケージ mariadb.x86_64 1:5.5.65-1.el7 を 削除
---> パッケージ postfix.x86_64 2:2.10.1-6.el7 を 削除
--> 依存性解決を終了しました。

依存性を解決しました

===================================================================================================================================
 Package                         アーキテクチャー          バージョン                           リポジトリー                  容量
===================================================================================================================================
削除中:
 mariadb-libs                    x86_64                    1:5.5.65-1.el7                       @base                        4.4 M
依存性関連での削除をします:
 mariadb                         x86_64                    1:5.5.65-1.el7                       @base                         49 M
 postfix                         x86_64                    2:2.10.1-6.el7                       @anaconda                     12 M

トランザクションの要約
===================================================================================================================================
削除  1 パッケージ (+2 個の依存関係のパッケージ)

インストール容量: 65 M
上記の処理を行います。よろしいでしょうか? [y/N]y
Downloading packages:
Running transaction check
Running transaction test
Transaction test succeeded
Running transaction
  削除中                  : 2:postfix-2.10.1-6.el7.x86_64                                                                      1/3
  削除中                  : 1:mariadb-5.5.65-1.el7.x86_64                                                                      2/3
  削除中                  : 1:mariadb-libs-5.5.65-1.el7.x86_64                                                                 3/3
  検証中                  : 1:mariadb-libs-5.5.65-1.el7.x86_64                                                                 1/3
  検証中                  : 1:mariadb-5.5.65-1.el7.x86_64                                                                      2/3
  検証中                  : 2:postfix-2.10.1-6.el7.x86_64                                                                      3/3

削除しました:
  mariadb-libs.x86_64 1:5.5.65-1.el7

依存性の削除をしました:
  mariadb.x86_64 1:5.5.65-1.el7                                    postfix.x86_64 2:2.10.1-6.el7

完了しました!
リポジトリを追加します
リポジトリ公式サイトは下記を参照
$ yum localinstall http://dev.mysql.com/get/mysql80-community-release-el7-3.noarch.rpmmysqlのリポジトリが登録されていることを確認します。
$ ls /etc/yum.repos.d/ | grep mysql*
mysql-community-source.repo
mysql-community.repo
問題なく追加されていました。
早速mysqlをインストールします。
$ yum install mysql-community-devel install mysql-community-serverインストール確認チェック
$ mysql --version
mysql  Ver 8.0.20 for Linux on x86_64 (MySQL Community Server - GPL)
これでversion: 8.0.20インストールは完了です。
自動起動を有効に起動します。
$ systemctl enable mysqld
$ systemctl start mysqld
起動状態を確認します。
$ systemctl status mysqld
● mysqld.service - MySQL Server
   Loaded: loaded (/usr/lib/systemd/system/mysqld.service; enabled; vendor preset: disabled)
   Active: active (running) since 木 2020-05-07 16:14:12 JST; 2min 52s ago
     Docs: man:mysqld(8)
           http://dev.mysql.com/doc/refman/en/using-systemd.html
  Process: 14626 ExecStartPre=/usr/bin/mysqld_pre_systemd (code=exited, status=0/SUCCESS)
 Main PID: 14722 (mysqld)
   Status: "Server is operational"
    Tasks: 38
   CGroup: /system.slice/mysqld.service
           └─14722 /usr/sbin/mysqld

 5月 07 16:14:06 centos-7.shared systemd[1]: Starting MySQL Server...
 5月 07 16:14:12 centos-7.shared systemd[1]: Started MySQL Server.
問題なく起動していることを確認しました。
次は、mysqlの設定です。
mysqlの設定
初期パスワードの変更
まずは、インストール時の初期パスワードを確認しmysqlにログインします。
$ cat /var/log/mysqld.log | grep root
2020-05-07T07:14:10.506362Z 6 [Note] [MY-010454] [Server] A temporary password is generated for root@localhost: [パスワード]

$ mysql -u root -p
Enter password:
Welcome to the MySQL monitor.  Commands end with ; or \g.
Your MySQL connection id is 8
Server version: 8.0.20

Copyright (c) 2000, 2020, Oracle and/or its affiliates. All rights reserved.

Oracle is a registered trademark of Oracle Corporation and/or its
affiliates. Other names may be trademarks of their respective
owners.

Type 'help;' or '\h' for help. Type '\c' to clear the current input statement.

mysql>
ログイン完了です。
次に初期パスワードを変更します。(自分の覚えやすいパスワード)
パスワード条件は下記の通りです。
- 8文字以上
- 英大文字・小文字・数字・記号を含める。
※ ここでは仮に「Password!321」としています。
mysql> ALTER USER 'root'@'localhost' identified BY 'Password!321';
Query OK, 0 rows affected (0.01 sec)
変更後のパスワードでログインできれば問題ありません。
とりあえず、上記でmysqlは動作するところまできました。
次はphpmyadminのインストールです。
phpmyadmin インストール
まず、以下のコマンドを実行してphpmyadminのリポジトリを有効化します。
※ ここでは、php73をインストール済みとしています。
$ yum info --enablerepo=remi,remi-php73 phpmyadmin
読み込んだプラグイン:fastestmirror, langpacks
Loading mirror speeds from cached hostfile
 * base: ftp-srv2.kddilabs.jp
 * epel: ftp.yz.yamagata-u.ac.jp
 * extras: ftp-srv2.kddilabs.jp
 * remi: ftp.riken.jp
 * remi-php73: ftp.riken.jp
 * remi-safe: ftp.riken.jp
 * updates: ftp-srv2.kddilabs.jp
利用可能なパッケージ
名前                : phpMyAdmin
アーキテクチャー    : noarch
バージョン          : 5.0.2
リリース            : 2.el7.remi
容量                : 6.9 M
リポジトリー        : remi
要約                : A web interface for MySQL and MariaDB
URL                 : https://www.phpmyadmin.net/
ライセンス          : GPLv2+ and MIT and BSD
説明                : phpMyAdmin is a tool written in PHP intended to handle the administration of
                    : MySQL over the Web. Currently it can create and drop databases,
                    : create/drop/alter tables, delete/edit/add fields, execute any SQL statement,
                    : manage keys on fields, manage privileges,export data into various formats and
                    : is available in 50 languages
インストールします。
yum --enablerepo=remi-php73 install phpMyAdmin
phpMyAdmin用データベース作成
下記SQLファイルのphpmyadminへの権限んを与えます。
/usr/share/phpMyAdmin/sql/create_tables.sql-- (activate this statement if necessary)
GRANT SELECT, INSERT, DELETE, UPDATE, ALTER ON `phpmyadmin`.* TO
'hogehoge'@localhost;編集後、mysqlにログインし実行しますsqlファイルを実行します。
mysql> source /usr/share/phpMyAdmin/sql/create_tables.sql
Query OK, 1 row affected, 2 warnings (0.01 sec)

Database changed

〜中略

Query OK, 0 rows affected, 2 warnings (0.00 sec)
php.iniの設定
次にphp.iniの設定を行ます。
$ vim /etc/php.ini
~中略

[Session]

~中略

; RPM note : session directory must be owned by process owner
; for mod_php, see /etc/httpd/conf.d/php.conf
; for php-fpm, see /etc/php-fpm.d/*conf
;session.save_path = "/tmp"
session.save_path = "/var/lib/php/session"
次に、セッションディレクトリにnginxがアクセスできるようにパーミッションを変更します
$ chown -R root.nginx /var/lib/php/session
php-fpmの設定変更
listenの設定をsockに変更します。
$ vim /etc/php-fpm.d/www.conf;listen = 127.0.0.1:9000
listen = /var/run/php-fpm/php-fpm.sock上記追加後、php-fpmを再起動します。
$ systemctl restart php-fpm再起動後、sockファイルが作られていることを確認します。
$ ls -l /var/run/php-fpm/php-fpm.sock
srw-rw----. 1 nginx nginx 0  5月  7 20:59 /var/run/php-fpm/php-fpm.sock
nginxの設定変更
次に、nginxの設定を変更します。
$ vim /etc/nginx/conf.d/default.conf下記内容を追加します。
また、127.0.0.1:9000になっている部分をsockに変更します。
#fastcgi_pass   127.0.0.1:9000;
fastcgi_pass   unix:/var/run/php-fpm/php-fpm.sock;
location /phpMyAdmin {
alias /usr/share/phpMyAdmin/;
try_files $uri $uri/ /index.php;
location ~ ^/phpMyAdmin/(.+\.php)$ {
alias /usr/share/phpMyAdmin;
fastcgi_pass unix:/var/run/php-fpm/php-fpm.sock;
fastcgi_param SCRIPT_FILENAME /usr/share/phpMyAdmin/$1;
include fastcgi_params;
fastcgi_intercept_errors on;
}
}上記追加後、nginxを再起動します。
$ systemctl restart nginx
Firewallの設定
mysqlの外部接続を許可します。
$ firewall-cmd --add-service=mysql --zone=public --permanent
$ firewall-cmd --reload
接続確認
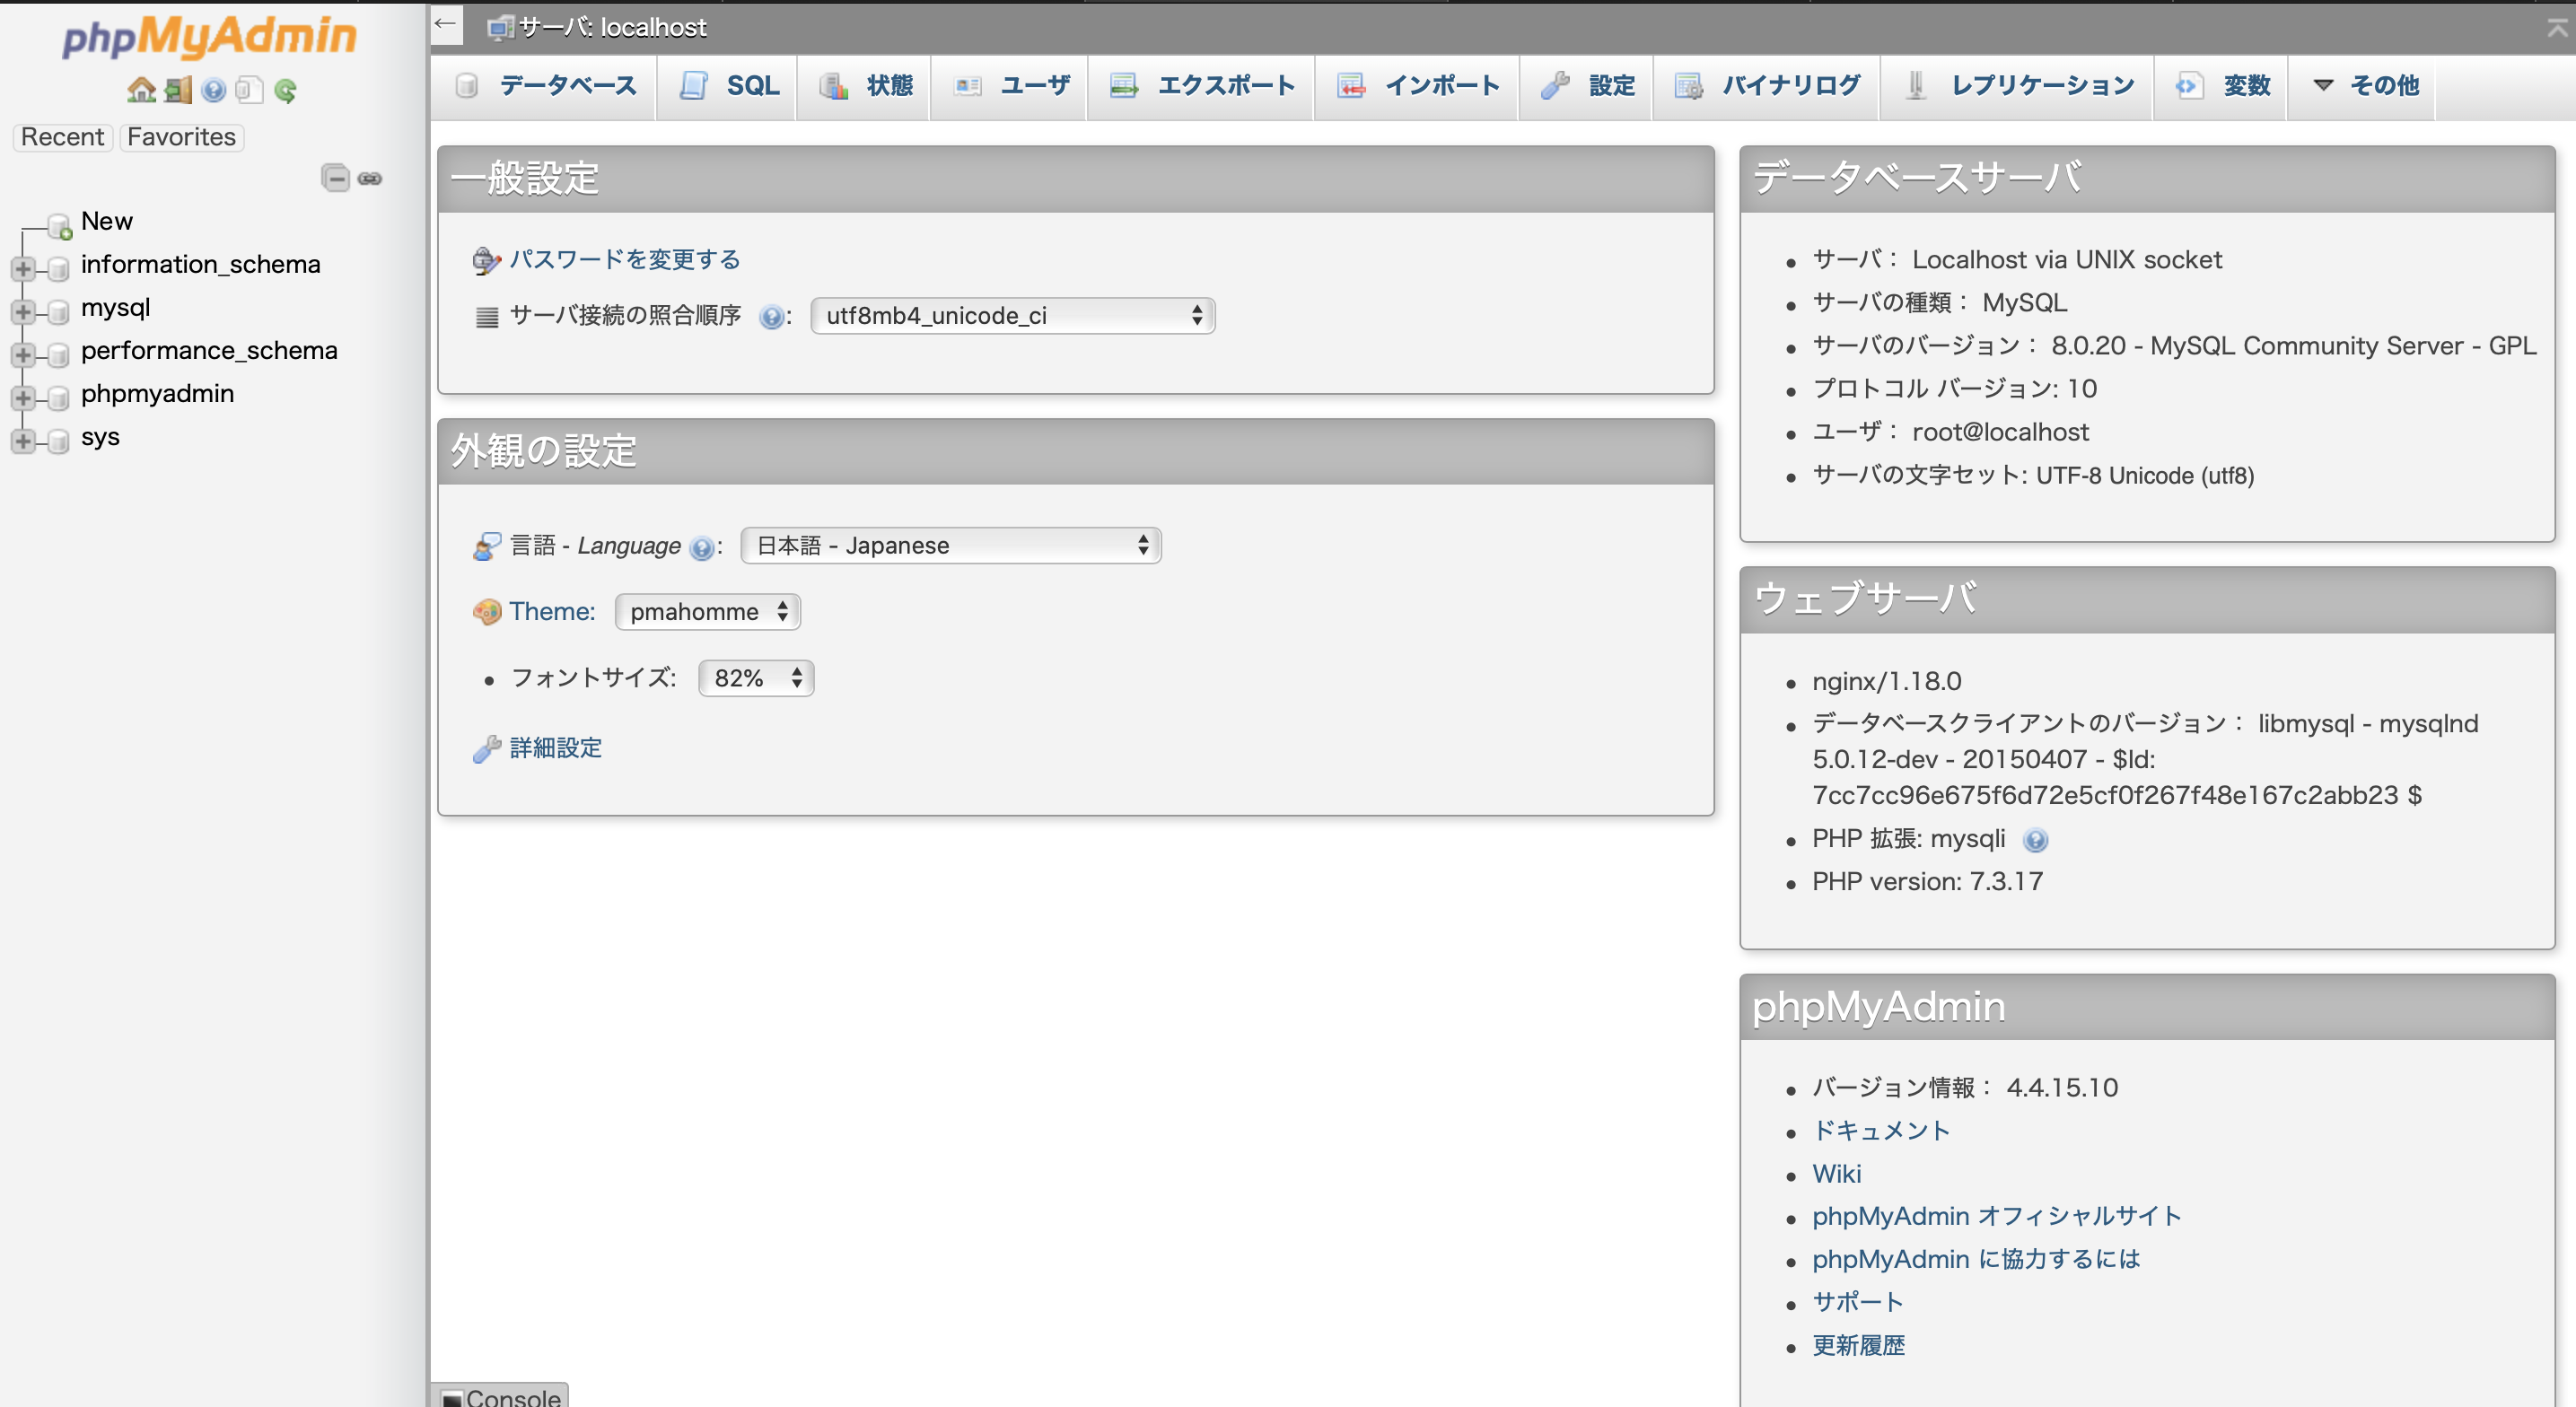
実際に「http://localhost/phpMyAdmin/index.pnp」にアクセスしてみます。
問題なくアクセスできました。
mysqlへのログインに失敗!!
phpMyAdminの表示まではできましたが、mysqlへのログインができませんでした。
今回導入したmysqlのバージョンは8.0.20で、MySQLのセキュリティレベルがあがったようです。
ですので、認証方法を変更します。
mysql> use mysql;
Reading table information for completion of table and column names
You can turn off this feature to get a quicker startup with -A

Database changed
mysql> ALTER USER 'root'@'localhost' identified WITH mysql_native_password BY '[自身のパスワード]';
Query OK, 0 rows affected (0.00 sec)
また、my.cnfにも下記を追記します
[mysqld]

# 旧 MySQL Clientとの互換性確保
default_authentication_plugin=mysql_native_password
上記設定後、mysqldを再起動します。
systemctl restart mysqld再度、phpMyAdminにアクセスし、ログインしてみます。

ログインできました。
最後に
mysql8系の認証設定でかなりつまずきました。
参考にしてみてください。


